This is the story of Najith, a beginner producing great images! 🙂
He was inspired by this render (made from a V-Ray expert!) and modeled it from zero. But Najith is a V-Ray beginner and this was the render “BEFORE” my trainings:
(*) Are you curious? > > This is the render AFTER! Read all the post to know more!
How to improve it?
Only 15 days ago Najith  started studying on CG BLOG PREMIUM : at first “10 lessons to start“ (to start correctly with V-Ray, test, final and gamma settings) and the training “MINIMAL EXTERIOR“. I want to share with you some suggestions I gave him about Shot, Materials and Sky to improve his render.
(1) SHOT
The shot was not so bad, but we can improve the “3d perception” with simple adjustments:
- The camera was placed 2,5 meters from the ground >> Place the camera 1,5 meters from the ground. This create a more immersive rapresentation that increase the realism.
-  Camera focal lenght = 45mm >> Use lower focal lenght (30mm) to emphasize the perspective. Also move your camera on the right to show more right-side of the building.
Click on the image below to verify how these simple suggestions can improve the shot:
(2) MATERIALS
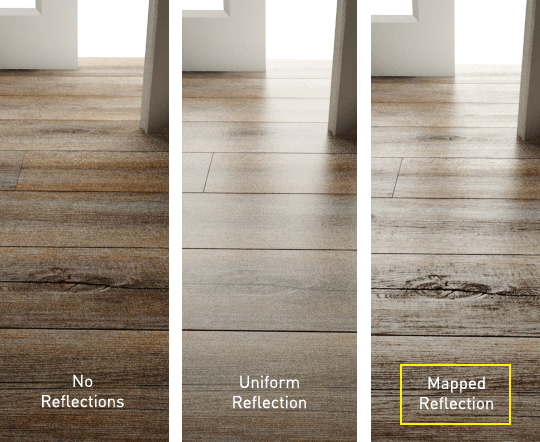
Creating basic V-Ray materials is very simple! In our course we have the lesson#8 and also a specific area for common settigs: V-Ray Educational Material. Basic reflecions are good, anyway in some cases it’s better apply a MAP to avoid uniform(=flat) reflections.
Look at this esplicit examples:

Najith applied maps to the exterior wood.
To know more read my post: “Improve your renders with reflection maps”
(3) SKY
Sometimes poeple use the first “sky background” they found on google images: wrong! The sky is a really important element in the image and we need to find the perfect sky for our render. In this case the sky was not particulary interesting, with no “personality”:

A good sky can incredibly improve all the image! Now look this sky below.
Clean, with some nice cloud.. and especially with “personality”:

Najith’s render… “after”.
In 15 days Najith studied and applied my little suggestions. After a little work with photoshop this is the result:

IS NAJITH AN EXPERT?
Be expert means having experience and he just started with V-Ray.
The point is that you don’t need to be “expert” to produce great images. The experience will you get better and better, but everyone – with reliable, simple and right information can produce outstading works.
The goal of my trainings is making people aware what they do with V-Ray.
To achieve this result I follow my simple 5SRW method: “5-Step Render Workflow”.
If you want to start studing our method
>Â Subscribe now LEARN V-RAY”
 / Also Learn Corona Renderer


Very nice. Also very inspiring to see this kind of improvement in 2 weeks. Well done!
here is the original render by design works
http://www.evermotion.org/vbulletin/showthread.php?t=81821
He was inspired by this render > http://www.evermotion.org/vbulletin/showthread.php?t=81821 (made from a V-Ray expert!!), but Najith is a V-Ray beginner and his start was not so good…
Damm… Nice Nice Nice!
This is why I sent you a mail 🙂
Hoping to receive the same thing as Najith did…
Did you receive my mail now? 🙂
Because I answered yours about a week ago 🙂
kind regards!
Excellent Work ……… Good Luck ! 🙂
Hello Ciro Sannino its beautiful Render Real.Good Luck Master
Good Render
sir i defenatly join ur class for that i collect money i m vry glad ur keeping me in touch thanks
best thx