Hey guys! How are you today? 🙂
I’m going to talk about VRay Fur and the new VRay Hair Material.
I want to show you how to create a shader very similar to the wonderful Sullivan‘s fur in the movie Monsters, Inc. (Pixar):
![]()
* VRAY-HAIR-MTL > V-RAY version 2.20 (minimum) required *
Do you want to know more about? 😉
Although it may seem complex and only for super-nerd-experts… this result is really simple to achieve and you can create a lot of nice objects with Monsters&Co look after this little tutorial! Your friends and your colleagues will admire you I’m sure!
If you’re a boy, your girl friends will love you on facebook… if you are a girl.. mhhh.. let me know! 😀
Ok, enought taking.. Lets’ start.
The START scene just include a V-Ray Sun, basic settings for Global illumination and a Torus Knot whith some genetic modification! Nothing new, nothing special until now. If you just click render you’ll get someting like this:
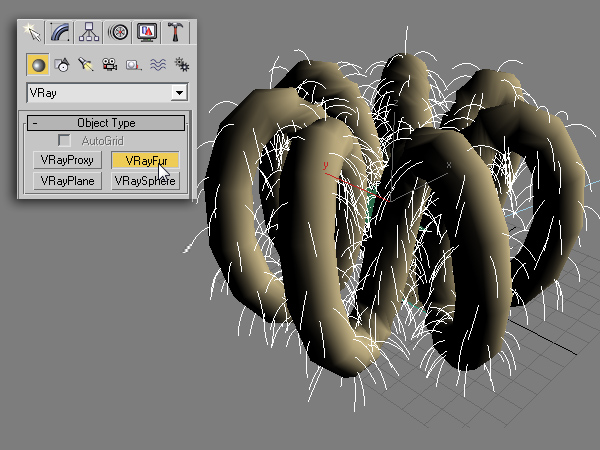
At first Select the TorusKnot object, then go to > Create > VRay > click on VRayFur.
You’ll see something like this in your viewport:

Let’s adjust some parameter of VRayFur (check the commentaries!):
- Lenght: 14cm
- Thikness: 0,1 cm
- Taper: 1,0
- Knots: decrease to 6 (reduce the segment of a single hair to save memory)
- “Per Area”: increase to 8,0 (take care with option! This to get a lot of hairs. For tests start from 2,0)
Note: VRayFur should need more memory – If you need more memory, avoid “unload geometry” by setting > Render Panel > Settings > Dynamic memory Limit = 4000 (for me this works fine)
This is the render with a generic V-Ray Material (In VRayFur, “per Area” = 2,0)
Now it’s time to create this funny shader:
I just mixed two VRayHairMtl using a standard BLEND material.
The map I used to mix them into 1 material is “Cellular“.
Click on the image below to have a clear idea of this simple structure… easier to see than explain, as usual!
- To get a more brilliant “VRayHair” I just increased Primary Specular to Rgb 130,130,130
- To get green and violet hairs I modified “trasmission” option in VRayHair
- To get a “polka dots” effect I manipulated Cellular options
Set you materials following the red boxes, add this shader to the VRayFur object and click render!!!
And that all folks, my friends, so easy! 🙂
TIME FOR SHARE!
Create your objects with “Monsters&co look” and share them your renders on Facebook, twitter, Pininterest and PLEASE also share this post: invite your friend to come here!
Here the START scene if you want to follow the tutorial, and the FINAL to check the options:
- START SCENE
- COMPLETE SCENE – Simple Monsters&co Shader
Share & Enjoy!
Ciro Sannino
V-Ray Licensed Instructor – link
SUBSCRIBE AND ACCESS 10 Interactive Courses for 1 year!
During this period a V-Ray Licenced Instructor® will be available to help you with trainings:

Read all info about 1 YEAR GOLDÂ > CLICK HEREÂ
 / Also Learn Corona Renderer


Hello Ciro.
In my VRay list of material I not find the VRayHairMtl material you name, why can it be?
Thanks (sorry for my english)
Hi Carlos.. you need the last version!
(VRAY HAIR MTL: recently added”)
The Last version of VRay plugin?
What is? I have a VRay Advance 2.00.03
Thanks
You need at least V-Ray 2.20…. anyway the latest is V-Ray 2.30 😉
Thanks!
if i use mix or v-ray blend mat instead of stander blend .. will be the same or the result will be different ?
Hi “user”,
“VRay Blend Mat” and “Blend material” are totally different.
In this case we need to blend with a MASK.
and with mix also different ?
yes! There’s no mask, just coating. Anyway you can check the online guide of vray http://www.spot3d.com/vray/help/150SP1/vrayblendmtl_params.htm
Wonderful tutorial!
you really can’t beat VRay fur. It’s just so easy to use
Thank you .
I Hope that you will be successfully in work.
awesome – thank you very much 🙂
Wonderful
Thanks Ciro.
How can use mask for concrete wall?
cool ! very helpful thank you
hi! It’s had a dynamic vrayfur?
wow… so easy to use thanks…
Nice & Use full one……Thank u……….
this is great …thank a lot
Hi!
When put to render, 3ds max closes automatically.
how can I fix this?
thanks
Hi Mayara,
I think you don’t have enough memory to handle the settings. Just reduce “Per area” to 1,0 and check it 😉
how we can apply a color of white hairs. (as head of white hair) ?
thanks
Hi Soufiane,
the first parameter of VRayHairMtl is the color: just choose “white”, shiny or matte.
Check this screeshot > http://screencast.com/t/16FByvc7HgL
As you can see there are different colors you can choose. (In this tutorial I created “MonstersInc” colors by hands because there was no presets for this.)
hi
thans sir ciro but i want this result with vrayfur
click here screenshot : http://hpics.li/ab7c0f0
thans
Hi Soufine,
your request sounds strange! You are talking about the lesson about materials for “DELICATE ROOM”!! Did checked it? > https://www.cg-blog.com/index.php/2012/05/07/floor-curtain-carpet.htm 😉
Wish I had time to learn how to do this.
Love it!
Hi Ciro,
Really great tutorial!
I’ve got 2 questions 🙂
1) When I finally render the Image the result is great en totally the same as you explained it in your tutorial! but when i try to save the image I get this result:
http://img208.imageshack.us/img208/9052/firstrendern.jpg
it’s always very grey whin i save…What could be the problem of this?
2) Is it still possible to buy you’re book? 🙂
Kind regards,
mathias
Hi Mathias,
in preferences -> Gamma and LUT -> OUTPUT must be 1,0 (probably this is your problem)
About the book here the link: http://www.grafica3dblog.it/libro/eng.htm
Thank you!
Ciro
Haha thanx a lot!
This was indeed the problem!!
My output and my input gamma were both 2,2
and soon you can sent a book to belgium 😉
Really love you’re tutorials…
Hope i could ever make olso renders like yours
kind regards,
mathias
Hi Ciro,
I tried sending last week a mail to support@cg-blog.com
for more information about lessons…
Did you receive this?
Because my e-mail is acting strange 🙂
kind regards!
Mathias
You’ve got a message! check your mailbox 😉
pleas help me i want file called VRayHairMtl its missing on my computer
pleas send it
My program is vray 2.00.03
64 bit
advance thanks
max2012 of course
V. Interesting ………. Excellent Work Ciro…….. Good Luck ! :-O)