Description:
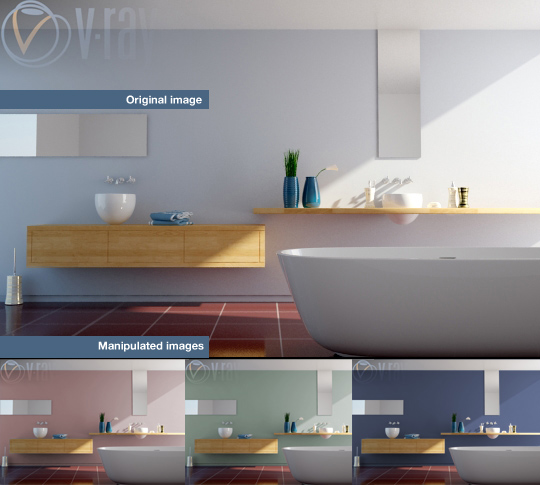
How many times did you encountered a terrible customer who suddenly ask you for deep color changes on your render?
How to quickly get results, if your render is already done?


Direct color correction in photoshop is great but not every time, this is time to use masks. With the photoshop masks you can make strong operations on the image, you just need a few minutes to create the perfect mask for your needs. Here’s how I usually do.
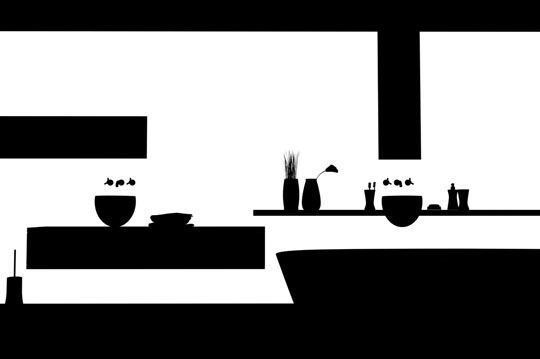
A fast way is the dear old Scanline. With Black and White materials I get that one:

Then in Photoshop complete the process. Watch the video for all details:

RESUME – In 3ds Max:
- Panel render (F10)> Common> Assign Renderer> Default Scanline Render
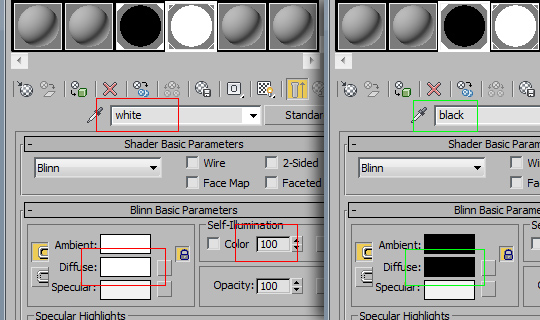
- create two standard materials: pure white and pure black:

- Make white what I want to change – Black the others.
- Turn off all the lights in the scene (don’t forget!)
- Hit render
RESUME -Â In Photoshop:
- Open render-base.jpg and render-mask.jpg
- In “render-base” Duplicate the layer
- Create a new mask
- Apply image > “render-mask”
- Make any changes you want
exercise related to Photoshop.
 / Also Learn Corona Renderer


Your method is coorect but whoah, the way you generate your mask is a little fastidious. There is a script, RENDERMASK that does the job for you, try : http://www.scriptspot.com/3ds-max/scripts/rendermask
Hi POQ2009,
yes I know this script, but I always prefer to explain a “method” if I can, I try to write an educational blog.
The script you are suggesting works fine (I already use it and I will suggest it next) , but my goal is to describe an idea you can also apply to any version, any software because it’s an universal concept.
that’s exactly what I expect from your blog Ciro, “educational blog”
nice post, tks
Woah! I didn’t know you can do that.Thank you so much, this will come in handy often!
You are a god… I always love your work. We are lucky to have a person like you even we are very far away.
Thank you a lot.
http://www.scriptspot.com/3ds-max/scripts/random-wire-color-tools
Works much better. Just a renderer Elements should include http://clip2net.com/s/YeFj
So you can change the color of any object in the scene, not just one.
Hi Vasily!
How are you? 🙂 Thank you for your contribute..
Don’t forget my blog is for explain concepts, so i HAVE to do “by hands” 😉
Plugins don’t allow to think.. and that post works perfectly for my “educational” blog.
Anyway Thank you for your link, I will surely test it. 😉
Thanks!!!
I think this a way which doesn’t involve scripts and lets you really understand the better techniques than relying on automated process. For me, its an eye opener to know some ways, methods and techniques which are manual but it let’s you understand the process itself fully.
I loved to use fast and automated scripts but sometimes it’s also fond learning the process involve on achieving such effects. Thanks for sharing Ciro-San!!!!
Yes Sir Rikimaru,
you got exactly the spirit!!!!! 🙂
I’m happy.
its very helpful..thnks
Is there any way to change paint to texture paint
Hi Kurshed,
yes… something is possible. I hope to show some tip in the next posts 🙂
Excellent travail.
Voilà une méthode simple et facile à mettre en place pour réaliser des changements directement de couleurs dans Photoshop.
Et non, ce n’est pas fastidieux à réaliser.
Merci
Thanks a lot for this help….. Good Luck
Excelente, como siempre. Gracias!
RENDER ID……
Hi Bob,
so if « the render is complete and I need a mask on the fly » (as I write in the post)
you render again with ID?
Great job!!! 😛
But I dont’ like waste my time.
Hi Bob,
please read the introduction. Contextualization is really important.
( « How to make it faster if your render is already done? » )
This is a good method to create a mask on the fly, indeed. The only problem to me is concerning a very selective client that understand a little more about light, colors and its physical effects. I say this because even though the wall color have changed, the scene didn’t receive the contribution of the color, that would bounce around the place and change the atmosphere of the scene, even if just a little.
But I’m not saying that this method is wrong, just that if the client is a very selective one, he/she may want to see this color bleed in the scene. But also, there is the very good point in this technique that you can use this manipulated image just as a way to see if it is close to what the client wanted, just to give him/her an idea if it is close to what he/she expected and get the approval. Also it would be his/her fault to have this change of mind and go back on the initial idea/design/etc, but I know that as the professionals that we are and taking into consideration the human aspect of this area, we have to accept certain situations. As we work with people this should be taken into consideration as well. hehe
Sorry for my bad english and if I sounded arrogant, just stated my opinion. In fact, I liked very much of this technique and it was only after that I thought about the color bleeding. I would also like to say that your initiative to help people sharing your knowledge and experience is remarkable, as well as the content of this blog. Keep up the good work! =]
It is very cool, Tnx Ciro again
This technique helps a lot in the case of two or more ideas for the environment or object.
Since we know that the post process in Photoshop is essential, because for the most perfect rendering always has to improve,
goodbye
I look forword a better tomorrow.
Hey, Ciro, what good tutorial, congratulations, I hope that you keep up.
Personally I always render with wirecolor vray element
it’s better than render ID, just assign random colors for creating objects and voila
after render you have great mask for EVERY object, not only for walls like in this tutorial
Thanks a lot for sharing it.
Thank you .It interesting
08/02/2011 – 1:51am
This just saved my life. Got some images to deliver in a few hours, and this saved me HUGE TIME.
Thanks, from Salta Argentina!
Great! it extremely meets my need.
I refer to my co-work, they like it
i wonder that i could forget assign render scanline, and at the end replace it by save immage as .tif with button ” create chanel map”
Thanks for giving this kinds of designing tips. wishing a very good day &all the best
This is really a super technique…………..Will help me save a lot of time for sure………….Thanks.:)
Hi to everyone!
Ciro I used your method. but it took me quite a long time. Later, I found that in render elements you can choose wire color element and have the same result, I think so, with the script “random wire color” as Vasiliy Chaban said before.
I haven’t use this script yet, but lately i use a lot many render elements and I add recently the wire color.
It helps me to choose every object quickly, change their colors, and not only, and manipulate them very easy.
Yes Vikoum,
thank you for your comment. The point is this method is universal and you don’t require vray to use it 😉
If you’re working with vray use wire color: it’s really helpful as you say 🙂
thanx for giving like this type of tips .. its very helpfull to improve my skills
thanks for this tip.its more useful
Hi Ciro,
I am new for Photoshop .so, In this video your Photoshop version is not in English Language .so,I can’t understand fully .Can you send it in English language.
Thanks.
Yes HINA,
you’re right! I planned to do a new video in 1 week, Thanks.
Sir Ciro,
This is surely an awesome technique !! 🙂 But, the link isn’t working anymore :((
It’s working now… thanks!
Save time,nice work